Thursday, December 18, 2014

wishing I had a blast cabinet!

I have been cleaning all of the engine parts by hand lately. I have spent a lot of time behind a 3m pad and wire wheel. And I have used more degreaser than I would like to admit. It is amazing how hard seventy year dried dirt can be. I spent at least two hours with my dremel tool cleaning tight places, and I am still not done. I am two seconds away from going to go buy a blast cabinet! I have a sand blaster might as well use it. The only problem is if I ruin a part I am done for, not much out there for this truck left. So for now slow and tedious. I found a few pin holes in the bottom of the oil pan nothing to hard to fix 30 seconds with the mig welder and good as new. Every thing is cleaning up nice so paint should be coming when it the temp warms up. Water pump up date I might have found a impeller and a place to rebuild the bushings in the pump. I am waiting on a email for the impeller with a photo and dimensions on a old part with a similar number. I cleaned up the purolator oil filter except the old graphic. I found a picture on the internet of the label hopefully I can have a new one made.


Monday, December 8, 2014

New Cylinders installed!

Today I spent a little bit of the morning cleaning off paint and grime on some of the small engine parts. Got a good deal cleaned off the valve cover and some of the other parts. Then loaded up the kids and went to my Dad's to work on the engine a little. I cleaned some over sprayed paint off of the top of the engine, and finished cleaning out the water jackets, and then with the help of my son we installed the sleeves and pistons! Soon I will have to primer the rest of the small engine pieces and then spray some color. So far so good and it has only been six months!

clean

Empty.
The cylinders slid in easy!
Number one.


One left.

Saturday, November 29, 2014

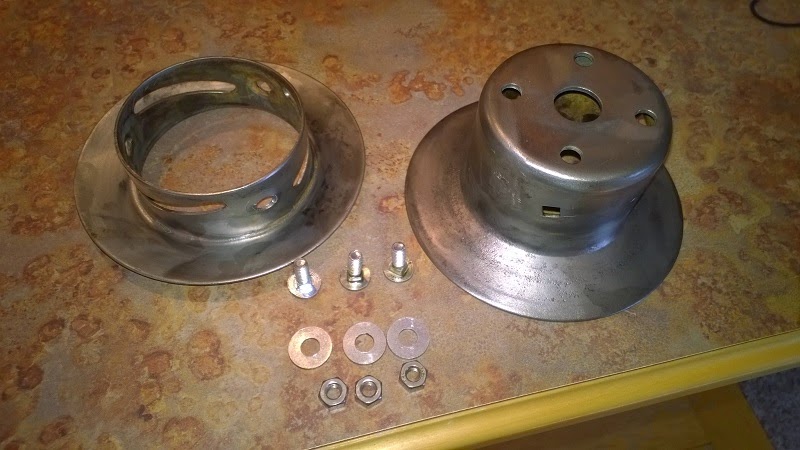
I spent some time on the water pump pulley. The pulley slides front to back to adjust the belt tension. The two pieces were locked together and would not come apart. I soaked them in Marvel Mystery Oil and PB blaster for two days then slowly drove them apart. Cleaned them up with a wire wheel and now it looks and works like new just needs paint.


Thursday, November 27, 2014

Happy Thanksgiving! Today I cleaned and washed the engine and cleaned and washed it some more then I spent a hour taping off all mounting surfaces for primer then I took a brake ate a great turkey dinner. Then got back out to the shop and put on some primer!


Thursday, November 6, 2014

Water pump woes I took apart the water pump and this is what I found, only 3/4 of the impeller there so far I can't find a replacement so it looks like I will have to make a new one. And it came of in two pieces. I cleaned the carburetor a little and my garage, I couldn't find any thing. Looks like it is about time to start cutting some gaskets and taping off the engine block for primer. The truck is at my fathers house so it is a bit hard to drive over to work on little things, so I am going to bring over some of the pieces of the truck to my house to work on. Like the cab to start working on the wooden frame.

Saturday, November 1, 2014

I got the crank back from the machine shop and my new bearings in the mail the day before. This week I will clean the block for painting. And I will start working on the small parts of the motor, water pump intake ect... Now the big debate goes on how to paint the engine (original colors of course.) but do I put it all together and paint it as a whole like it would have come out, or do I clean it up and make it neat. I am leaning toward neat. I have also researched what colors the the factory offered for the truck and parts so I have some choices on the body colors that were available in that year. Lots to do and est. two and a half years left to do them in. Lately I have met some more people that can help me in this journey how small this world is I met a man that lives less than 500 yards from me that has several 1930's International trucks and has offered some advice. And hinted that he may have some parts for the truck!

I decided to Google electrostatic engine cleaning and came up with lots of ideas. So I figured that I could do it my self so for a little less than forty dollars I was able to clean the rust from the engine my self. It was real easy(This is not for everyone I felt I was fully capable to do this on my own!). Use a 55 gallon plastic barrel fill with water and house hold washing soda, place waste electrodes in line of sight of rust you want to remove, hook up a negative clamp from battery charger to engine, positive to waste electrodes. Keeping electrodes from touching the block was the hard part! I used a piece of rubber drilled holes for my waste electrodes and ran them threw the block, I attached the other ends with wooden blocks to keep them from making contact with the block. Applied electricity and watched it go!( Please remember this is electricity and it can kill if not handled properly!.) If it is working properly the negative piece will bubble and the removal of rust will begin. The other down side to this is it has to be outside the bubbles coming from the water are Hydrogen and Oxygen which is flammable!. So I safely completed the cleaning. The engine sat in it's bath for 48 hours or more. And you can see from the pictures below just how much rust came off!.